10L0L golf cart carburetor Installation Tutorial
Installing a new carburetor in your golf cart, whether it's a 10L0L brand or another, can help improve engine performance. Here's a general installation tutorial for a golf cart carburetor:
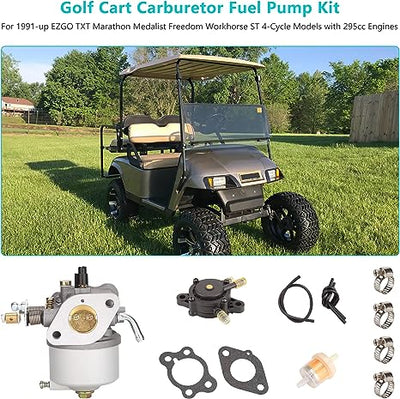
Tools and Materials Needed:
- New carburetor suitable for your golf cart model
- Socket and wrench set
- Screwdrivers
- Pliers
- New gaskets (if not included with the carburetor)
- Carburetor cleaner
- Shop towels or rags
- Safety glasses
Installation Steps:
-
Safety Precautions: Before you start, ensure the golf cart is on level ground and the engine is turned off. Disconnect the battery to prevent any accidental starts.
-
Locate the Carburetor: The carburetor is usually located on the engine, and you can typically find it by following the air intake or the fuel line from the gas tank.
-
Remove the Old Carburetor: Use the socket and wrench set to remove the bolts securing the old carburetor to the engine. Carefully disconnect any linkages, fuel lines, and vacuum lines attached to the carburetor.
-
Inspect and Clean: Once the old carburetor is removed, inspect the mounting surface for any old gasket material or debris. Clean it thoroughly.
-
Install the New Carburetor: Place the new golf cart carburetor on the mounting surface. Reconnect any linkages, fuel lines, and vacuum lines to the appropriate ports on the new carburetor. Be sure to follow the manufacturer's instructions for proper connections.
-
Replace Gaskets: If new gaskets are not pre-installed on the carburetor, place new gaskets between the carburetor and the mounting surface. This helps ensure a proper seal.
-
Secure the Carburetor: Use the socket and wrench set to secure the new carburetor in place with the mounting bolts. Tighten the bolts in a crisscross pattern to ensure even pressure.
-
Adjustments: Depending on your specific golf cart model and the new carburetor, you may need to make some adjustments. Follow the manufacturer's instructions for adjusting the carburetor settings, such as the idle speed and air-fuel mixture.
-
Clean Up: Use carburetor cleaner and a shop towel to clean any spilled fuel or residue around the carburetor and engine.
-
Test Run: Reconnect the battery, start the engine, and test the golf cart to ensure it runs smoothly. Make any necessary adjustments to the carburetor settings as needed for optimal performance.
Remember to consult your golf cart's manual and the specific instructions provided by the manufacturer of the new carburetor for any model-specific details. If you're not comfortable with this process, it's advisable to seek the assistance of a qualified mechanic or technician for installation and adjustments.




Leave a comment
Please note, comments need to be approved before they are published.