How do you install a folding windshield on a golf cart?
A folding windshield is a valuable accessory for golf cart owners, providing protection from wind, rain, and debris while allowing for increased airflow when needed. Whether you own a Yamaha, Club Car, or EZGO golf cart, installing a folding windshield is a relatively straightforward process that can be completed with a few basic tools. In this guide, we will walk you through the step-by-step process of installing a folding windshield on your golf cart, ensuring a secure and hassle-free installation. And for all your golf cart accessory needs, trust 10L0L to provide high-quality products that enhance your golf cart experience.
Step 1: Gather the Necessary Tools and Materials
Before you begin the installation process, make sure you have the following tools and materials:
- Folding windshield kit (specifically designed for your golf cart model)
- Screwdriver or drill with appropriate bits
- Socket wrench or adjustable wrench
- Safety glasses
- Gloves
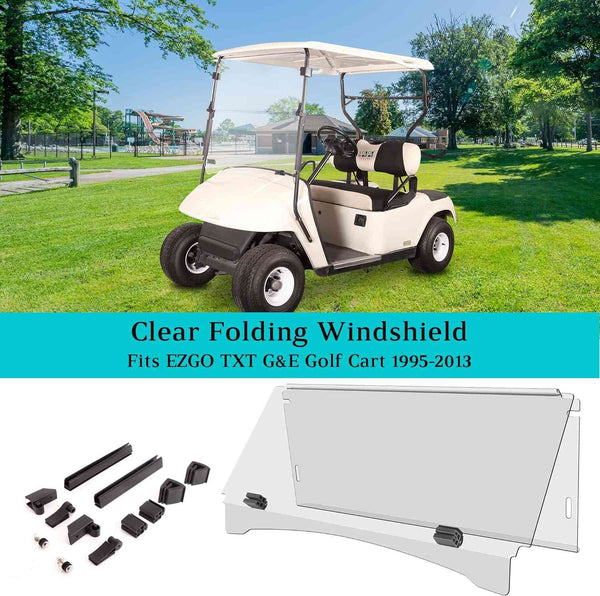
Ensure that the golf cart windshield kit you purchase is compatible with your Yamaha, Club Car, or EZGO golf cart model. 10L0L offers a wide range of folding windshields designed specifically for these golf cart brands, ensuring a perfect fit and optimal performance.
Step 2: Prepare the Golf Cart
Before installing the folding windshield, it's essential to prepare your golf cart by removing any existing windshield or accessories that may obstruct the installation process. Follow these steps:
- Park your golf cart on a flat and stable surface.
- Turn off the ignition and remove the key for safety.
- If your golf cart has an existing windshield, carefully remove it by unscrewing the bolts or clips that secure it in place. Keep the hardware in a safe place, as you may need it for the installation of the new folding windshield.
Step 3: Position the Folding Windshield
Now that your golf cart is prepared, it's time to position the folding windshield for installation. Follow these steps:
- Unpack the folding windshield kit and ensure that all the necessary components are included.
- Carefully position the folding windshield on the front of your golf cart, aligning it with the mounting holes or brackets.
- Check that the windshield is centered and level, ensuring a proper fit and appearance.
Step 4: Secure the Folding Windshield
With the folding windshield in position, it's time to secure it to your golf cart. Follow these steps:
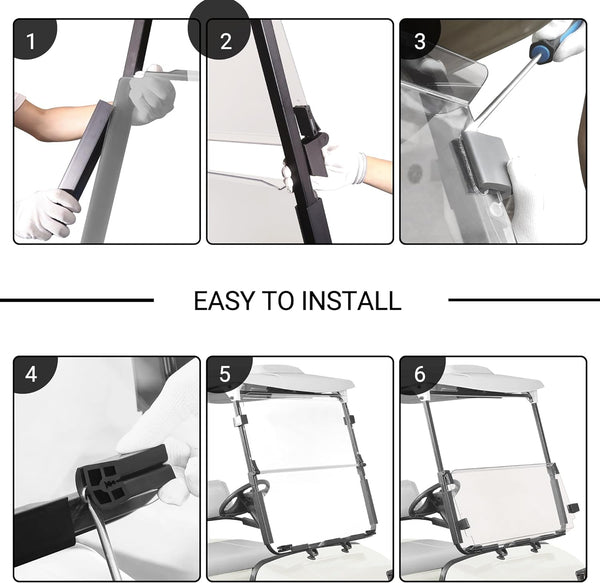
- Using the provided hardware (bolts, screws, or clips), attach the folding windshield to the mounting holes or brackets on your golf cart.
- Start by loosely securing the hardware, ensuring that the windshield remains centered and aligned.
- Once all the hardware is in place, use a screwdriver or drill with the appropriate bit to tighten the bolts or screws securely. Be careful not to overtighten, as this may damage the windshield or golf cart frame.
Step 5: Test and Adjust
After securing the folding windshield, it's important to test its functionality and make any necessary adjustments. Follow these steps:
- Gently open and close the folding windshield to ensure smooth operation.
- Check for any gaps or misalignments that may need adjustment.
- If adjustments are needed, loosen the hardware slightly and reposition the windshield as necessary. Then, retighten the hardware securely.
Step 6: Clean and Maintain
Once the folding windshield is installed and properly adjusted, it's important to clean and maintain it regularly to ensure optimal visibility and longevity. Follow these steps:
- Use a mild soap and water solution to clean the windshield, avoiding harsh chemicals that may damage the surface.
- Dry the windshield thoroughly with a soft, lint-free cloth to prevent water spots or streaks.
- Inspect the hardware periodically and tighten if necessary to maintain a secure fit.
Conclusion
Installing a folding windshield on your Yamaha, Club Car, or EZGO golf cart is a simple process that can greatly enhance your golf cart experience. By following this step-by-step guide, you can ensure a secure and hassle-free installation, allowing you to enjoy the benefits of added protection and increased airflow. Remember to trust 10L0L for all your golf cart accessory needs, including high-quality folding windshields designed specifically for Yamaha, Club Car, and EZGO golf carts. Elevate your golf cart experience with 10L0L and enjoy the outdoors in style and comfort.

